Wednesday, April 18, 2012

Cookies

School's almost out!  Soon you will be free!

Dear Kate,

I had this great idea that if I started a blog about cooking I would feel compelled to write lengthy, inspiring posts to you, sharing family recipes, tips, stories which would someday make you wax nostalgic for the days of your youth.  Surely, by using a public forum, I wouldn't slip into my habits of putting off until tomorrow what I really need to do today.  Alas, procrastination runs deep in me.  And I have hardly posted anything lately. 

But like any true procrastinator, I will first cast blame elsewhere.  I will cast it where you, while wanting blame me, will not be able to resist joining me in throwing stones.  In short, it is your brother's fault.  Whenever I am struck by the desire to take photos of some wonderful heirloom recipe with a plan to write a brilliant, yet touching (dare I say pithy?) post about by-gone days and the virtues of comfort foods, the camera is on location with your brother capturing the minute movements of mini-figures, like this:

I think this poor Lego has been abducted by aliens. 
But the truth of the matter is that I've been lazy, not to mention a little focused on a new hobby.  And it is all the fault of other bloggers!  Ok, enough laying blame.  As you know, my new thing is cookie making.  I have been learning the tips and tricks of decorating sugar cookies.  It is fun for the whole family - I make cookies, the rest of you eat the cookies when the dog doesn't eat them first.  Win-win.

I've spent a lot of time copying other blogger's cookies, but slowly.  Very.  Very.  Slowly. I am coming up with a few ideas of my own.  My favorite so far is this little chick on the left:


He may not look all that exciting, but it was a big step for me to see a chick in the shape of a shamrock cookie cutter!  Now, I'm starting to see designs around me that could be made into cookies.  For example, I saw some throw pillows which inspired these cookies:


 Of course, in my head these looked really amazing, but I'm fairly pleased with how they turned out. 

A favorite cookie blogger I like to follow, who goes by the moniker "Lila Loa" is having a little contest to see what design you can make with a particular cookie cutter which is supposed to be a package with a bow.  Now, many talented women have submitted designs, some of which are simply incredible.  While I don't think my contribution stands out compared to the others, what I am excited about is that I came up with anything at all.  The key to some of the spectacular cookies I've seen on other blogs seems to be not only the technique used to ice the cookies, but also the unique vision that led to the cookies in the first place.  I love a cookie where I wonder "how did they come up with that idea?"  So this is my contribution, an ode to the upcoming end of the school year:


I've got some other ideas for this cookie cutter as well and if I get around to it, all add it to this post.  I have a feeling there will be several cookie posts in the future, but I'll try to remember to cook something else once in a while.

Love, Mom

Thursday, January 5, 2012

French Fries!

Dear Kate,

I'm sure you remember a few years ago when we were on vacation in Maine we went to Old Orchard Beach, home of two important things:  Palace Playland and Lisa's Pizza.  The pizza is not the greatest, but the french fries, known as pier fries, are awesome.


I assume the original pier fries were actually made by a place located on the Old Orchard Beach pier.  Maybe you can still buy them there, but I always liked Lisa's Pizza, located just up the street.  People have been enjoying pier food here for more than 100 years, which is kind of amazing considering the bad luck the pier has suffered.  It was built in 1898, rebuilt after a fire in 1907, again after a storm washed most of it away in 1909, again after another fire in 1970, and finally once again after a blizzard in 1978.  There was once a casino and a ballroom located at the pier, and Frank Sinatra even played there once.  Now it is home to food, bars, and touristy shops.


The Pier as seen from the Ferris Wheel.

And don't forget Palace Playland, home of classic amusement park rides, like the Ferris Wheel, bumper cars, the purple rollercoaster, and my favorite, The Matterhorn.  I love the cheesy, carnival atmosphere that is like stepping back in time.


The Matterhorn!

I was so excited to discover that I could make homemade fries that taste remarkably like pier fries!  I've always been a little afraid to deep fry anything.  I knew a girl when I was young who was terribly burned as a toddler by frying oil that caught fire.  Now that you and your brother are old enough to remain safely out of the kitchen when told, I decided to try my hand at frying.  Donuts, fried dough (another favorite from Old Orchard Beach), french fries... excuse me while I stop drooling on the keyboard.

Roughly square off four sides of the potatoes.  Doesn't have to be perfect, just makes it easier to make nice rectangular fries.
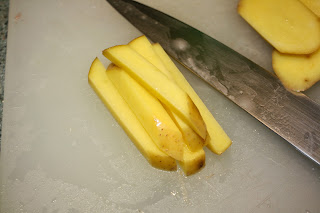
Cut the fries a little more than 1/4" to 1/3" wide.  These are on the wide side, which makes for a chewier fry, rather than crispy ones, which is what I prefer.

These french fries are so easy I can't believe I never tried making them before.  Probably it is because usually you have to double fry french fries them to get the texture correct, which is just a little too much effort for me.  Once again, America's Test Kitchen came through with a new technique that is easy and as close to fool proof as you can get.  Start with cold oil, bring to a boil, cook.  That's it.  No small batches.   No dropping things in hot oil even once, let alone twice.  So easy.  Supposedly starting with cold oil means the fries absorb less oil, but who knows?  We're eating french fries - I guess we aren't too worried about a little oil.


French Fries 
Adapted from The Complete America's Test Kitchen TV Show Cookbook 2001/2011

2.5 pounds Yukon Gold potatoes (do not substitute other potato types - this recipe requires the low starch and higher water content of Yukon Gold potatoes)
6 Cups peanut oil (vegetable oil works, but the taste is best with peanut oil)

1.  Square the potatoes and cut lengthwise into 1/4" to 1/3" strips - be as uniform as possible.  No need to peel the potatoes.
2.  Add to cold oil in large Dutch oven.  Cook over high heat.  Once the oil boils, cook 15 minutes.  Do not stir.  
3. With tongs, gently stir the potatoes, scraping the bottom to release any stuck, and cook 5 to 10 minutes more until crisp and golden.  With tongs, skimmer, or slotted spoon, remove from oil onto paper towels.  Salt and serve immediately.

Don't forget to make the world's best burger with your fries with this AWESOME method.  First, break up the ground beef on a tray and platter and divide into equal size mounds (one pound of ground beef will yield four burgers).  Loosely smoosh (technical culinary term) into 1/2" thick patties.  Do not press into perfect patties, you want these really loose.

See how they are just barely patties? 
Season with salt and pepper, but only if you will be cooking right away.  If you plan to set these in the refrigerator to cook later in the day, hold off on seasoning until you are ready to cook.  

Butter soft hamburger buns.  Melt 1 Tablespoon butter in a 12-inch skillet over medium heat, then toast half the buns.  Remove and toast the other half.  Remove and set aside.

Add 1/2 teaspoon of vegetable oil to the skillet and turn up the heat to high.  With a spatula, carefully add the patties to the skillet.  If a piece falls off during the move, just press gently back in place.  As the patty cooks it will become more cohesive.  Cook without moving for 3 minutes.  Flip and cook another minute before adding a slice of American cheese (don't get fancy with the cheese, this is a diner-style burger) and cooking an additional minute until the cheese is melted.  Remove and place on buns, top as you like.


Wednesday, August 3, 2011

Back to School Brownies

Dear Kate,

August 1 and school is back in session.  After a summer of playing, swimming, movie watching, hanging out with friends and a trip to Maine, it is time to get back to our routine, including my routine of cooking.  I started things off right, with bread dough rising by 7am and fresh bread on the counter cooling by 11am.  Shortly thereafter, your brother's beloved dog, newly adopted, informed me that he could reach anything left on the counter and is particularly fond of bread.

The thief.

Kayton's punishment was suffering with a stomachache and mine was worrying about having killed the dog with my bread on his third day living with us.  The good news is Kayton is fine and my kitchen counters have never been so free of anything edible.

As a reward for surviving your first day of school, I made Triple-Chocolate Brownies to welcome you home.  (Cooled in the laundry room with the door shut for reasons that by now should be obvious.)
You melt the chocolate and butter together over the stove as part of this recipe and I prefer to use a double boiler for that job.  If you don't have a double boiler, you can use a medium-sized heatproof mixing bowl over a saucepan of simmering water.  Just don't make the mistake I made once of having a bowl that fitted a little to snugly in the saucepan and expanded when heated to completely suction onto the saucepan. (Should you disregard this and end of up with this problem, cool the bowl with icy water so it will contract and release from the saucepan.

These brownies are so rich and fudgy, I wish everyday was the first day of school.  I cut these into small squares as a few bites are all you really need.  Then I proceed to eat more than one piece because they are so delicious. Since we have to keep these out of dog reach, I stored them in an airtight container in the refrigerator and I think I like them even better chilled.  Guess I have to thank Kayton for that, but it doesn't make us even for the loss of the loaf of bread!


Triple-Chocolate Brownies
(Adapted from The Complete America's Test Kitchen TV Show Cookbook)

5 ounces semisweet or bittersweet chocolate, chopped
2 ounces unsweetened chocolate, chopped
8 Tablespoons (1 stick) butter, cut into quarters
3 Tablespoons cocoa powder
3 large eggs
1 1/4 Cups sugar
2 teaspoons vanilla extract
1/2 teaspoon salt
1 Cup unbleached all-purpose flour

1.  Melt the chocolate and the butter over simmering water, stirring occasionally, and melted and smooth.  Whisk in the cocoa and set aside to cool.
2.  While the chocolate mixture cools, preheat the oven to 350 degrees.  Line an 8-inch pan with foil and spray with cooking spray.
3.  Whisk the eggs, sugar, vanilla and salt in a bowl until combined.  Whisk in the cooled chocolate mixture (the chocolate can be warm, but you don't want it hot enough to cook the eggs.  Whisk as you pour in the chocolate to help avoid cooking the eggs.) 
4.  Using a spoon, stir in the flour until just combined.  You don't want to overmix. 
5.  Pour into pan and bake for 35-40 minutes.
6.  Cool for two hours in the pan on a wire rack.  You can lift out the brownies by the foil and cut into small pieces. 

Tuesday, May 17, 2011

Skillet Ziti

Dear Kate,

It always seems like a victory when I find a meal that everyone in the family will eat.  Grammy was telling me just the other day how frustrated she used to get by trying to find meals that made everyone happy.  Even when she made something we all liked, it didn't necessarily mean that we all felt like eating it the night she made it. She also said it only got worse as we got older.  When I apologized, in typical Grammy fashion, she said that's ok, it isn't your fault.  Then we both laughed because, in fact, it was definitely my fault, at least in part.  I was, after all, one of the complainers making mealtime difficult!


This ziti recipe is one of those meal victories where we all sit down together and eat the same thing.  Ok, maybe your brother doesn't love it, but he will eat some and knows better than to complain.  That's victory enough for me.


I love to make baked ziti, but it can be time consuming.  This version is pretty quick (4 steps! and one of those is preheating the oven!) and uses just one pan.  I appreciate this fact more than ever now that your dad is laid up with his hurt ankle and I no longer leave the big pile of dinner dishes for him to clean up - I have to clean it myself!  You will definitely want a 12-inch oven-safe skillet and a lid to make this.  I recommend a non-stick skillet, but a regular skillet works without a huge mess.


Skillet Ziti
(Adapted from The Complete America's Test Kitchen TV Show Cookbook)

1 Tablespoon olive oil
2 Tablespoons minced garlic (about 6 cloves)
Pinch red pepper flakes (more if you like a little more spice than your brother)
1 (28-ounce) can crushed tomatoes
3 Cups water
12 ounces ziti (uncooked)
1/2 Cup heavy cream
1 ounce grated Parmesan cheese (about 1/2 Cup)
1/4 Cup chopped fresh basil leaves
Ground black pepper
Table salt
4 ounces shredded mozzarella cheese

1.  Preheat oven to 475 degrees.
2.  Heat oil in 12-inch skillet over medium-high heat.  When it is hot, add the garlic, red pepper, and 1/2 teaspoon salt, cooking about 1 minute.  
3.  Add the tomatoes, water, ziti, and another 1/2 teaspoon salt.  Cover and cook, stirring regularly, simmering until the ziti is nearly cooked, about 15 minutes.
4.  Mix in the cream, Parmesan and basil, seasoning with salt and pepper to taste.  Sprinkle mozzarella evenly over the top, place in oven uncovered, and bake 10 minutes.  Remember the handle will be hot for a while after you remove it from the oven.  

Monday, May 9, 2011

Homemade Oreos

Dear Kate,

You seemed a little put out that I would post a recipe for fajitas, which you have no interest in ever eating.  The whole vegetarian thing.  But you could make the fajitas without the meat and it would still be very good.


To make up for it, today is homemade oreos.  They don't quite taste the same as an oreo, but they are so yummy and much better than Poor-eos (your dad's name for the generic brand imitation oreos). Other than the obvious reason for liking these, namely that they taste pretty darn close to an oreo, there are few reasons why I think these are great to make, but you have your own reasons for liking them. 


My reasons:

1.  No eggs required.  Perfect when I want to make something sweet, but I'm out of eggs.
2.  You don't have to soften the butter.  Perfect for when I forget to set the butter out at room temperature.
3.  You mix the whole thing in the food processor.  No sifting flour, no mix liquids in one bowl and dry ingredients in another.  Dump it all together and let the food processor do the work.
4.  You can make the dough the night before, refrigerate, then cook and assemble the next day.  Spreads out the labor.  (It can be a little labor intensive to do all in one day.)
5.  Chocolate yummy goodness.

Your reasons:
 1.  No eggs required.  You can eat the dough raw.
2.  The recipe says you have to roll the dough into a log.  That makes you snicker, especially when you look at the chocolate log.  Really?  Does the bathroom humor never get old?
3.  CHOCOLATE YUMMY GOODNESS!


Homemade Oreos
(Adapted from a couple of different recipes on SmittenKitchen.com)

 1 1/2 Cups all-purpose flour
3/4 Cup dutch cocoa powder (hard to find in the grocery store, but Hershey's Special Dark Cocoa works fine).
1 Cup plus 2 Tablespoons sugar
1/4 Teaspoon salt
1/4 Teaspoon baking soda
14 Tablespoons unsalted butter, cut into tablespoons
3 Tablespoons milk
1 Teaspoon vanilla extract

Combine the flour, cocoa, sugar and salt in food processor and pulse a few times to combine.    Add cut butter and pulse several times.  Mix the milk and vanilla together, then add gradually while the food processor is running until combined.

Dump the dough onto the counter or a large cutting board.  You may need to knead it a little to mix it evenly.  Form the dough in a log (snicker) about 1" in diameter.  Wrap the log (snuck) in wax paper or foil and refrigerate for at least one hour.

The oven racks should be positioned with the upper rack in the upper third of the oven and the lower rack in the lower third of the oven.  For me, the means the upper rack in the second highest position and the lower rack in the second lowest position.  Preheat the oven to 350 degrees.  Line two baking sheets with parchment paper.  Remove the log (hee hee) from the refrigerator, unwrap, and cut into thin slices (about 1/8 to 1/4-inch thick) and place about an inch apart on the baking sheets.

Place one baking sheet on the upper rack and one on the lower rack, bake for 5 minutes, then rotate the sheets back to front and upper to lower.

Cool on the baking sheet 5 minutes, then cool on a rack.

Filling:

1/2 Cup (one stick) unsalted butter, room temperature
1/2 Cup vegetable shortening
4 Cups powdered sugar
4 Teaspoons vanilla

Cream the butter and shortening in a stand-mixer on medium-low for 1 minute.  Scrape down sides of bowl.  Add powdered sugar and vanilla, mix on low until mostly combine, then increase speed to medium-high and beat 2-3 minutes until fluffy.

Assembling the cookies:

Assembling is easy, but it looks best if you use a pastry bag for the filling.  You can use a knife, but it won't look as good.  With a pastry bag with a large plain tip, pipe a layer of filling, leaving a small border at the edge of the cookie.  I have this silly frosting contraption I got from Pampered Chef, a hard plastic thing you fill with frosting, with these large tips.  (You can see it in the last picture.) It isn't very good for frosting cakes, but it is perfect for this.  The assembly is the tedious part, but the finished product is worth the effort.  


Wednesday, May 4, 2011

Grilled Pork Tenderloin Fajitas

Dear Kate,

Life has been a little crazy around here.  Two weeks ago your dad was hurt at a fire.  Thankfully it was only a ligament in his ankle, but it hurts, he can't drive, and he is hobbling around on crutches.  Having to take over some of the things he does has me just a little busy.  And maybe a little grumpy.  Sorry about that.  You and Jake have been a great help to your dad, carrying things for him and making sure he is comfortable, plus you haven't complained about the extra things I've asked you do as well.

As if that wasn't enough going on, you got braces!  As I've told you, you look remarkably normal in braces, not just one big metal mouth.  And you've handled it bravely with very little complaint.  (Complaining about getting braces is perfectly acceptable!)  Finally this week you have been able to start chewing and soon I hope you are back to eating without any discomfort.  We had a brief return to the chocolate shake for breakfast, making us remember those days in kindergarten. Which reminds me, time to make some muffins...

This recipe came from Family Fun magazine.  I'm kind of sad that you've outgrown that magazine.  I have fond memories of craft projects and games we used to play based on ideas from the magazine.  Do you remember the crazy car wash sprinkler your dad made for you and Jake to play in?  It was made out of PVC pipe with holes drilled in various spots, hooked up to a garden hose.  You and Jake LOVED it!


We also made some the April Fools food gags and you thought you were really fooling everyone.  One year we made a pretend hot dog and fries out of a pound cake and brought it to your Pops to fool him.  (I don't think it was actually April Fool's Day, but that didn't matter.)  Of course, he played along and was "fooled" by your trick.


We didn't make too many of the recipes from the magazine, but the couple I tried were pretty good.  I always got a laugh out of the idea that the recipes were kid friendly just because they had a fun name or shape, but knew you wouldn't be fooled by those recipes into eating something healthy!  This recipe makes yummy fajitas using pork rather than beef or chicken and the pineapple salsa gives it a vaguely Caribbean flavor. 


If you prepare everything in advance, all you need to do is throw it on the grill at dinner time.  You will want a grill basket for the veggies.


Pork Tenderloin Fajitas with Fresh Pineapple Salsa
(Adapted from Family Fun Magazine, June/July 2009)
Marinade:
1/2 Cup canned pineapple juice
2 Tablespoons fresh lime juice
2 cloves garlic, minced
2 Teaspoons cumin
1/3 Cup vegetable oil
1/4 Teaspoon pepper

Combine the marinade ingredients in a small mixing bowl and pour over tenderloin in baking dish or gallon-size zip lock bag.  Turn or toss to coat.  Marinate for at least 6 hours, preferably overnight.  

Fajitas:
2 pork tenderloins
2 large red onions, cut into eighths
2 green bell peppers, cored, seeded, cut into eighths
2 red bell peppers, cored, seeded, cut into eighths
8 flour tortillas, wrapped in foil

Heat the grill on high heat for 15 minutes.  Brush or toss peppers and onions with a little olive oil.  Grill the vegetables and the tenderloin over medium heat for about 20 minutes (internal temperature should be 145 degrees) turning occasionally.  (Vegetables will be easiest to cook in a grill basket.)
Transfer vegetables and tenderloin to a serving dish and let sit for 5 minutes.  With grill turned off, place foil-wrapped tortillas on grill to warm. Slice the tenderloin into strips and serve with vegetables, warmed, tortillas, pineapple salsa, and sour cream.  

Fresh Pineapple Salsa
2 Cups fresh pineapple, chopped
2 Tablespoons fresh lime juice
1/2 Cup cilantro
1/2 jalapeno pepper, seeded and chopped
1/2 Teaspoon crushed red pepper flakes
Salt

Place all ingredients in a food processor and blend until slightly chunky.  Cover and refrigerate 2 hours or more.
 

Thursday, April 14, 2011

Pizza Dough

Dear Kate,

A collection of recipes for you would not be complete without a recipe or two for pizza dough.  Your grandmother often talks about one of your dad's best friends who ate only pizza and peanut butter and jelly for many, many years.  For a while it was looking like you were going to do the same only it was pizza and macaroni and cheese.  It has always been the one food I know you will eat with gusto.


Ok, so this picture doesn't really capture what proofing the yeast looks like, but at least you can see the measuring cup very well!

I used to think that making my own dough meant that pizza night had to be planned well in advance and meant a struggle with unpredictable dough when it came time to make the actual pizza.  Mixing ingredients, rising time, kneading time, it all seemed like a lot of work.  Then you have to get it rolled out in a roughly pizza-like shape.  Will it be too sticky?  Will it be full of holes?  Will it be keep bouncing back into a small circle or will it roll into a nice size crust?  Eventually I just stopped making my own crust.  But with your love of pizza and my dislike of feeding you processed foods like frozen pizza, I began making homemade pizza again.


This pizza crust is so simple I would call it foolproof, except that when I made it recently I forgot 2 cups of the flour before I added the water, which resulted in a bit of mess before I got everything sorted out.  Rather than say it is foolproof, I should say that if you put in the right quantities in the right order, it is foolproof.  The dough is easy to work with and only needs a single rise of 45 minutes.  No major advance planning required.  Put the dough together, clean up, preheat the oven (the longer the better if you are using a pizza stone), get the toppings out, and by the time you are done with that the dough should be almost fully risen.  This dough was designed for a food processor, but I think it would work with a standing mixer and dough hook, or even mixed by hand with five minutes of kneading.


A couple of pointers for this dough, and really any other bread or dough you might make.  First, I like to proof the yeast by putting it warm water or other liquid for a few minutes before adding it to the dry ingredients.  Proofing used to be quite essential and if your yeast is old you definitely don't want to skip this step, as the point is to make sure the yeast gets bubbly and starts working.  If it doesn't, you need to throw it out and get some new yeast (or try again if you might have had the liquid too hot).  Not everyone proofs anymore because the yeast we buy now is more reliable, and particularly in breads with long rising time and plenty of liquid, the results are very much the same whether you proof or not.  However, I have found that proofing has another benefit, namely helping the yeast distribute evenly without yucky clumps of yeast in the dough.  Therefore, even if the recipe doesn't call for proofing I like to do it anyway as it never hurts, but often helps.

Second, before you begin working with a dough that you plan to roll out, be sure to let it rest after you get it onto your floured surface, before you start to shape it.  Resting the dough is supposed to relax it so it isn't as elastic.  As silly as it sounds to let dough "relax," it really does work.  Letting the dough sit can be the difference between a perfect crust of the right size and thickness or an elastic band that springs back to a small, thick round the minute you stop rolling it.

Third, tossing the dough can be a great way to get a nice round shape, so long as the dough is sufficiently tough and thick enough to allow it.  I have some dough recipes that cannot handle being tossed, but this one does well with a little toss in the air.  It isn't required, but looks impressive (at least until you drop it on the floor).


Finally, just like with the calzone, I find it is easiest to put together the pizza on a sheet of parchment paper and then slip it, paper and all, onto the pizza stone.  You can also generously sprinkle cornmeal on a pizza peel, prepare the pizza on the peel, and slide it into the oven, but I have found that sometimes the pizza sticks in spite of the cornmeal, which is incredibly frustrating.  Further, a lot of cornmeal ends up in the bottom of the oven and you either have to be vigilant about cleaning it up or you'll end up with a smoky oven very quickly.

Pizza Dough
(Adapted from Cuisinart Elite Collection Recipe Booklet)

1 1/2 Tablespoons active dry yeast
1 Teaspoon sugar
1 1/4 Cups warm water (100 to 110 degrees)
3 1/3 Cups unbleached all-purpose flour
1/2 Tablespoon kosher salt
2 Teaspoons olive oil

1.  Proof the yeast by dissolving, with the sugar, in warm water.  
2.  Add flour and salt to food processor (need a large bowl processor of 12 to 14 cups with dough blade) and process.
3.  If the yeast is foamy, with the food processor running, pour the liquid through the feed tube at a steady rate.  A dough ball will form and the sides of the bowl will begin to look clean.  Process an additional 30 seconds.
4.  Place olive oil in large bowl and place dough in bowl, turning to coat with oil.  (The dough may be slightly sticky.)
5.  Cover with plastic wrap and let rise in warm spot for 45 minutes (I find that on the stove top with the vent hood light on is just warm enough).  Preheat over to 450 degrees with pizza stone on rack in lowest position in oven.
6.  Punch down dough and place on a lightly floured surface.  Divide in half and form two small dough rounds.  Cover with the plastic wrap loosely and let rest 5 to 10 minutes.  Roll one piece into desired size and thickness.  
7.  Place on parchment paper on top of pizza peel or back of a cookie sheet.  Add sauce and toppings.  Sprinkle with a little of the garlic seasoning, particularly the crust.  Slide onto pizza stone.
8.  Bake 5 to 10 minutes, until cheese is melted and slightly brown.  Repeat with second dough ball.


You can also use this dough for calzones or stomboli.  If you don't have a pizza stone or you want a change, you can press the dough into lightly greased baking sheet sprinkled with a little cornmeal.  Top as usual and place in preheated oven (only needs a 5 minute preheat) on the lowest rack.  It may take slightly longer to bake if the dough is thicker.